Blog

Coleman Technologies Blog

We can give your organization comprehensive IT services and 24/7/365 live support for a predictable monthly fee. Stop stressing about technology, and start focusing on growing your business.

Let’s Review Your Facebook Privacy Protections

Let’s Review Your Facebook Privacy Protections

Last week we went through some of the issues that Facebook is dealing with in regards to its security and data privacy. Today, we thought it would be helpful to give you the tools you need to protect your privacy on Facebook.

0 Comments
Continue reading

Let’s Remind Ourselves How Meta’s Security Has Failed

Let’s Remind Ourselves How Meta’s Security Has Failed

Facebook remains one of the most visited places on the Internet. Meta (the parent company to Facebook) also features WhatsApp and Instagram on their roster and has faced numerous security and privacy failings over the years. In this week’s blog, we’ll take a brief look at some of the most noteworthy.

0 Comments
Continue reading

This Malware Targets Your Facebook Business Accounts

This Malware Targets Your Facebook Business Accounts

Chances are your business has a social media presence in at least some capacity, as it’s a good way to drive traffic to your business. However, hackers want to leverage this benefit against you. A new malware specifically targets Facebook business accounts to launch malicious advertisement campaigns using your own money against you.

0 Comments
Continue reading

Explaining the Metaverse

Explaining the Metaverse

The metaverse is a buzzword that many companies have been throwing around in recent years, but what is it, exactly? You might want to sit down for this one, as it is going to get a little complicated and, perhaps, even a bit confusing. We’ll do our best to unpack what the metaverse is, why there is such an emphasis on it these days, and what you might expect to see from a metaverse in the future.

0 Comments
Continue reading

Social Media is Being Scrutinized

To start, let’s go back a few years. In the aftermath of the 2016 Presidential election, another major social media company, Facebook, was under fire for allowing foreign companies to influence the outcome of the election through insite advertising. Google and Twitter were also caught up in the mess, but the scrutiny Facebook saw during the ordeal, well...really hasn’t gone away. 

0 Comments
Continue reading

Facebook and Your Privacy (Part 1)

What Does Facebook Know About Me?

Consider how many opportunities Facebook has to collect information about you: there’s quite a few. For one thing, you literally tell the platform the things you “Like.” Semi-joking aside, there’s also the stuff you post, which advertisements attract your attention, and many other means for them to construct a pretty solid profile on you.

You can see this profile for yourself. In the aftermath of the Cambridge Analytica scandal - where third-party users were granted free reign and access to Facebook user info - Facebook made a promise to be more transparent. This profile is part of that transparency.

Viewing this information is pretty simple, whether you’re on your computer or you’re using the mobile application.

On a desktop or laptop:

  1. Log in to your Facebook account.
  2. Click the down arrow on the top right and go to Settings.
  3. On the left, click Your Facebook Information.
  4. Facebook will present you with five options. Look for Download Your Information.
  5. Click View, Facebook will give you a screen where you can choose the date range and format of the data. Since we want to download everything, we’re going to set the Date Range to All of my data and set Media Quality to High. This will give us a higher quality version of all of our photos and videos in the download.
  6. Click Create File and Facebook will start building the download. This can take a while, but Facebook will give you a notification when your data is ready for download.
  7. Once Facebook gives you the notification, click it and Download your data.

From the Facebook mobile app:

  1. Tap the 3-bar hamburger icon in the top right of the app.
  2. Scroll down and tap Settings & Privacy, and then tap Settings.
  3. Tap Download Your Information.
  4. Leave all of the options checked, and scroll down. Ensure the Date Range is set to All of my data and that Media Quality is set to High.
  5. Tap Create File and Facebook will give you a notification when the data is ready for download.

The “data is ready” notification will probably come after about an hour - it really depends on how long you’ve been a user, and how active you’ve been. Most people will probably have a file that takes up a few gigabytes.

Now that the report is available to you, click on Your Facebook Information.

Access Your Information - Facebook provides you with an itemized and viewable list of your Posts, Photos, and Location history ready for viewing.

Activity Log - Consider this a comprehensive timeline recap - almost a scrapbook, prepared by Facebook.

Deactivation and Deletion - People used to complain that deleting a Facebook account was a difficult process. Not anymore!

So, How Much Does Facebook Know About Me?

When you do review your file, the information they have can be shocking, mainly due to the location-based aspect of it all. You can pull up a given day and find out exactly where you were and what you did. Facebook kept track for you.

Then, you need to consider the Ads. This section will show you all of the advertisers who provided Facebook with a contact list your name appeared on. It isn’t that Facebook gave away this information, advertisers already had it and gave it to Facebook to target you on the platform.

What Does This Mean?

While it completely makes sense that Facebook would know a lot about you, seeing it all laid out (and how much of it didn’t come from your profile) isn’t exactly comforting… Facebook has been too involved in a few major data breaches. Just think - there’s a profile just like the one you retrieved about you, for over a quarter of all of the people in the world.

This rabbit hole goes deeper, too. Make sure you check back soon for part two of three of this Facebook privacy blog series.

You probably had a notion that Facebook had a bunch of your information, but how much information outside of your general profile makes you nervous when they are accused of major data breaches. What’s scarier is that the service is used by over a quarter of the world’s population. 

This is only the tip of the iceberg of the information we will share about this social media giant. Check back for part two of our three-part blog series about Facebook privacy.

0 Comments
Continue reading

Facebook and Your Privacy (Part 2)

That’s why we wanted to make sure that you knew how to reclaim your personal data and make sure it is protected. We’ll start by protecting the information that you’ve shared.

To do this, you will want to access your Facebook account on a computer. This is going to be a lot to manage, and the mobile app would only be too much trouble to navigate.

Your Security and Privacy Options

From any page on Facebook, look for the menu, which will appear as a little downward-facing arrow. This should be at the top right-hand corner of the page. Click into Settings. This little arrow is your lifeline during this process, you can always find your way back to the beginning with that menu.

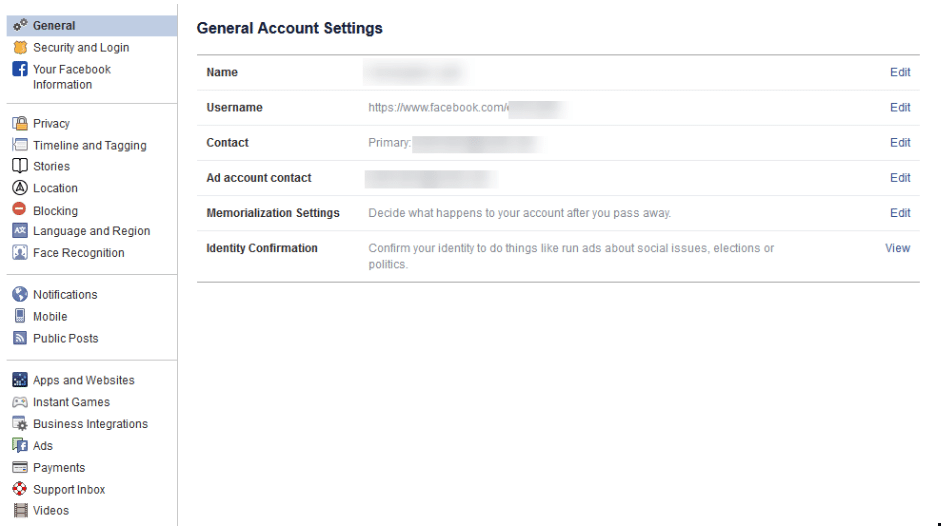
Verify the Accuracy of Your General Account Settings

Your first order of business should be to confirm that you still have access to all of the email accounts tied to your Facebook. If an account that you no longer have access to was used, account recovery becomes monumentally more difficult.

Find Out Where You’ve Used Facebook with Security and Login

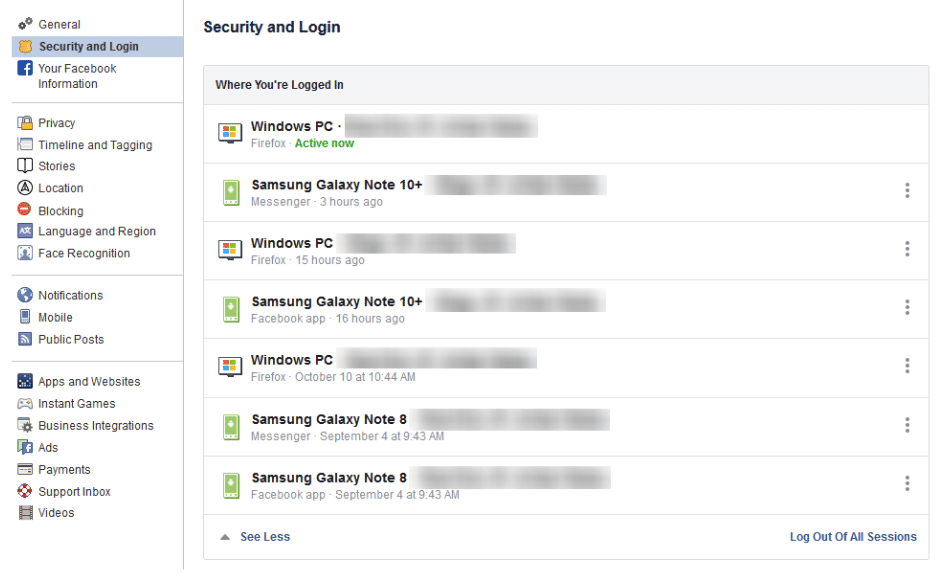
On the right, you should see the Security and Login option. Click it, and Facebook will show you all of the devices where your account is logged in. Fair warning, this can be shocking - especially since it includes where and when you last used that device, and what browser you were using to do so. The longer a user has been engaged with Facebook, the more devices will likely show up here.

If one of these devices is one that you don’t recognize, you will want to change your password immediately - we’ll go over how in a moment. First, you will want to log out of Facebook on any device that you aren’t actively using. This can be done through the three-dot icon menus next to each device listed.

Change Your Password

While we’re on the topic, this is when you will want to make it a point to update your password. It will only take a minute and might just help keep your Facebook friends from being spammed and phished. You can do this using the process provided on the Security and Login page.

Remember, you should never use a password for more than one online account.

Using Two-Factor Authentication

After your password settings, you’ll see the option to set up two-factor authentication (2FA) to help protect your account. To set it up, select Use two-factor authentication and click edit, and Facebook will provide you with the instructions you need to follow. Click Get Started

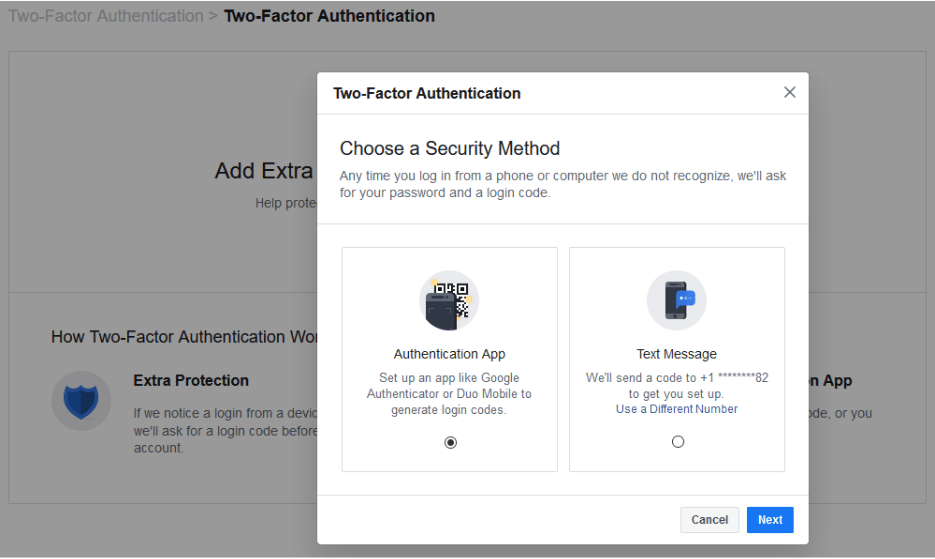
You have two options to select from as your Security Method, either using an authentication app, or to receive a text message with an additional code. Between the two, the application is the more secure option, although it does mean you need to have access to the mobile device whenever you want to check your Facebook.

Setting up the authentication app option is pretty simple. Open your application (which, if you have a Google account, might as well be Google Authenticator) and, on the computer, select the Authentication App option, as pictured, and click Next

Facebook will display a QR code, which your authenticator app should allow you to scan when you add a new account to it. The app will then give you a six-digit number to provide to Facebook as a Confirmation Code. Simple.

If you decide to use the text message option, Facebook will simply send you a code that you have to provide upon login. It isn’t quite as secure as the app, but it will do. All you have to do to configure this is to confirm an initial code with Facebook, and you’ll be walked through the rest.

Add a Backup

Once you have two-factor authentication enabled, it only makes sense to add an additional means of 2FA as an emergency backup - in this case, whichever method you didn’t choose. Honestly, you might as well set up both, and make use of the Recovery Codes option, to boot.

Under the Add a Backup option on the Two-Factor settings page, there is also a Recovery Codes option. By clicking Setup, Facebook will provide a brief explanation, and the opportunity to Get Codes. Facebook currently gives you a list of 10 single-use 2FA codes. These are one-shot codes, but you can generate a new list whenever you want from the Two-Factor Settings page. Make sure you keep these codes in a safe place.

Setting Up Extra Security

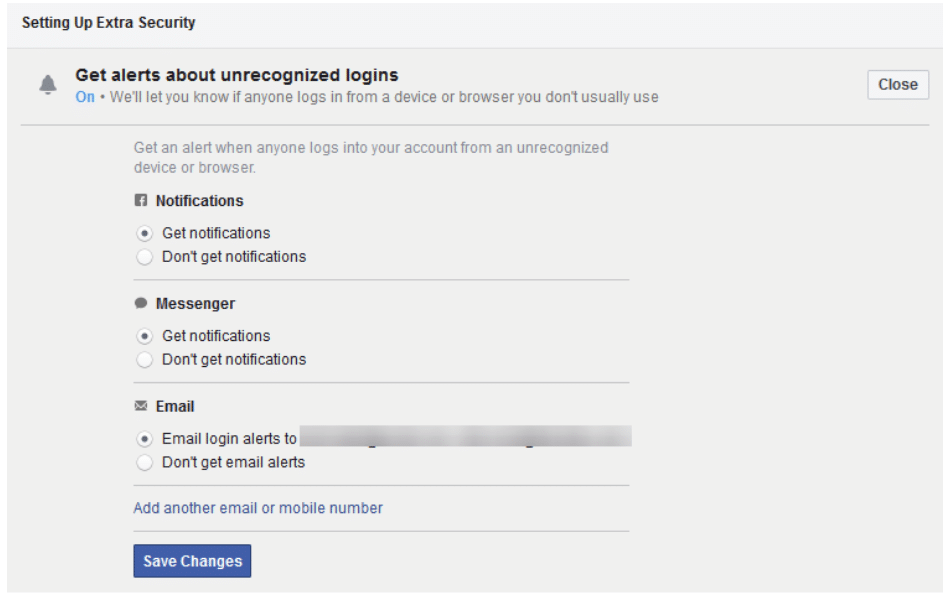
Back on the Security and Login page, scroll down to find Setting Up Extra Security. This area lets you opt-in to alerts being sent via email or text, notification, or Facebook Messenger.

You can also Choose 3 to 5 Friends to Contact if you do find yourself locked out of your account. Make sure that these are people you truly trust.

Stay tuned for part three of this series, coming soon.

0 Comments
Continue reading

Facebook and Your Privacy (Part 3)

While we wish we could show you how to really accomplish true privacy on Facebook, the only way to actually reach that threshold would require you to have never signed up in the first place. This doesn’t mean, of course, that there is nothing that you can do now to protect your information - sharing more cognizantly and keeping it within circles you trust.

A Few of Facebook’s Issues

Like we said, Facebook has seen some pretty egregious security issues during its time. While we aren’t going to go too far into the weeds with these events, a quick summary might help to illustrate how careful users should really be as they use the platform:

  • In 2007, Facebook introduced a feature that would allow companies to track purchases made by users and notify their friends of what they had purchased… without requiring any consent from the user.
  • In 2011, the FTC charged Facebook for allowing private user information to be accessed by third parties, making this private information public without any notification.
  • In 2013, Facebook introduced a Donate button that would allow users to make charitable contributions to such organizations. Unfortunately, a bug in the code allowed the email addresses and phone numbers of over six million users to be leaked.
  • In 2014, Facebook actively experimented upon their users, testing their ability to manipulate their emotional states with the content the user is exposed to. Depressing content was prioritized to see if they could elicit depressed feelings. As it turns out, they can.
  • In 2015, Facebook took action to assuage their users’ concern for their privacy, and rolled back the access that apps had to user data… but one has to wonder, just how much were applications privy to before this rollback?
  • In 2018, Facebook suffered a massive data breach, losing the data of 50 million users. In response, Facebook did nothing… that is, until their reputation started to suffer. It was only then that they responded to the underlying issues.

Unfortunately, concerning events like these happen far too regularly to Facebook. There just seems to be difficulty in keeping their user data secure. This is why you need to pay particular attention to the settings on your own Facebook profile. Let’s go over how your information can most effectively be protected by ensuring these settings are configured properly.

Configuring Your Facebook Privacy Options

On your desktop, log in to your Facebook account. At the top-right of the page, there will be a small down arrow. Click it to access a menu, then click Settings.

You will be brought to another page, with Privacy in your list of options. Click into it.
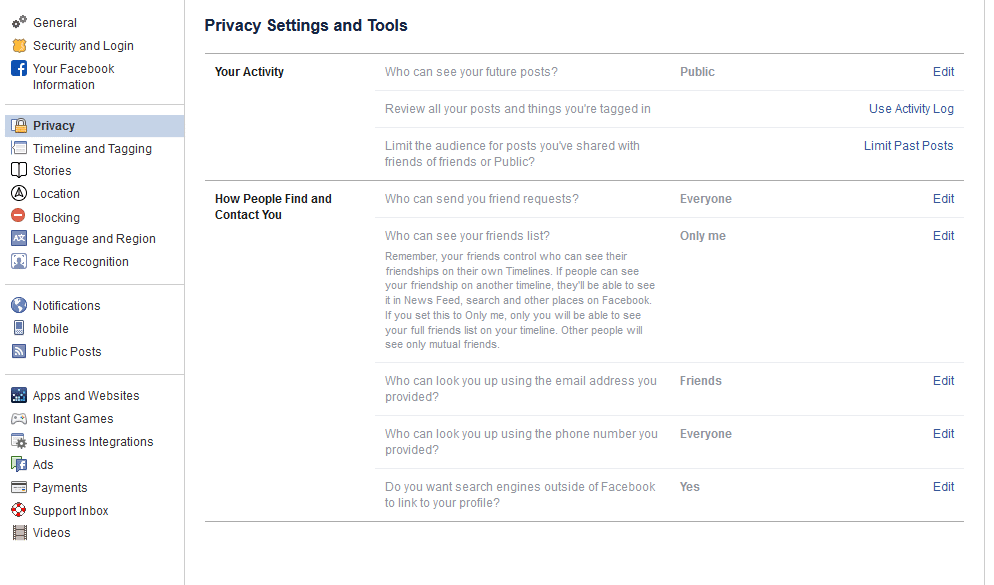
From here, you can set your privacy options that restrict who has access to your information. For example:

Public - Setting your privacy to public is effectively turning off your privacy options. Not only can all other Facebook users potentially see your profile, even people who aren’t signed in could access it. Hypothetically, this means that the search engines could find you are well.

Friends - This setting restricts viewing privileges to only your confirmed Facebook friends.

Friends except… - If there are particular friends or members of a particular group who shouldn’t see certain information, you can prevent them from seeing this on their Facebook.

Only me - This means that (outside of Facebook) you are the only person with access to what you have posted. Just to be safe, we recommend that you still refrain from sharing anything that you wouldn’t be comfortable sharing publicly.

You also have the ability to choose the audience for each individual post. While this may give the impression of improved control over your privacy, the biggest threat to your Facebook security is probably Facebook itself.

Of course, that doesn’t mean that you aren’t given plenty of privacy options to play with. Let’s go over some of them now:

Who can see your future posts? This setting establishes a default privacy setting for the content you post on Facebook in the future. This helps insulate you from sharing content out to those who shouldn’t see it.

Review all your posts and things you’re tagged in. By using the Activity Log, you can review the entirety of your timeline and manage the permission settings of past posts. You can also review posts you have been tagged in from here.

Limit the audience for posts you’ve shared with friends of friends or Public. This is a semi-nuclear option when it comes to locking down what you’ve posted in the past. By clicking Limit Past Posts, you can change all of what you posted publicly or to friends of your friends to only be accessible to those on your Friends list. Fair warning - Facebook doesn’t provide any way to revert this, so you would have to go through your posts by hand to change them back if you so wished.

Who can send you friend requests? Depending on your preference, you have the option of picking between Everyone or Friends of friends. Unlike many of the other settings on this list, leaving this set to Everyone is probably okay.

Who can see your friends list? On the other hand, there is no reason that the rest of the world needs to see who you are connected with on Facebook. Setting this to Only me will keep this information between you and Facebook, nobody else.

Who can look you up using the email address you provided? Do you want someone who has your email to be able to find you on Facebook using it? Most likely not - so restricting this to Friends or Only me is probably in your best interest.

Who can look you up using the phone number you provided? Again, it’s really your call whether or not to allow Facebook users to find you via your phone number, but it really isn’t that necessary. You’re fine setting this to Friends or Only me.

Do you want search engines outside of Facebook to link to your profile? This one really depends on your situation. Facebook can work to prevent the assorted search engines out there, including Google and Bing, from indexing your profile (allowing searchers to find it). Most people will likely want to switch this off, but if your personal brand is part of your business, it makes more sense to turn this option to Yes.

Dictating What Others Can Do On Your Personal Facebook Profile

We all have embarrassing friends, and so you may want to avoid having them be able to freely post content to your wall - for instance, your college buddy Greg seems to have no problem with sharing candids from the good ol’ days… and tagging you in them.

Potential situations like this make it all the better that Facebook gives you control over who can post to your timeline, and who can see this content. You can access your many options to do so by clicking into Timeline and Tagging (which can be found on the left side of your Settings).

Who can post on your timeline? Naturally, you will definitely want to put a limit on this, as there is no reason that a total stranger should be reaching out on your personal profile. This is why it makes sense to only allow your Friends to do so - or, perhaps you alone with the Only me setting.

Who can see what others post on your timeline? This setting will largely depend upon who you have permitted to post on your timeline. If your Friends can post to your timeline, you definitely want your Friends to be the only ones who can see it - assuming you don’t want to maximize your privacy (and hedge your bets) with the Only me setting.

Allow others to share your posts to their stories? Ask yourself: do you want anything you post publicly to be shared by your Friends? If so, leave this one enabled.

Who can see the posts you’re tagged in on your timeline? Tagging can be an incredibly useful thing for someone trying to cultivate an image as an engaged thought leader, but it can also hurt your reputation, never mind your privacy. If people keep tagging you in assorted posts and you’d rather the public at large didn’t see these posts, you can keep these posts to your Friends, or even to Only me.

Review the posts you’re tagged in before the post appears on your timeline?
Alternatively, this is likely the best option for someone looking to be visible via tagged posts, while still remaining in control of which posts that are linked to them. Basically, you can be notified if you are ever tagged in some Facebook content, and can opt whether or not it will appear on your timeline. Fair warning - any mutual friends you have with the person who has tagged you will be able to see the tagged content before you have a chance to review it. Regardless, it is best to keep this setting on.

Review tags people add to your posts before the tags appear on Facebook? Again, this is something you’ll want control over, so set this to on as well.

Managing Your Public Post Settings

Again, from the Settings page, click into the Public Posts option on the left-hand side.

Who Can Follow Me - Rather than adding users as Friends, public figures can provide the option to just be followed by interested people. If you want to give the public at large this option, set this to Public. Otherwise, you can keep your posts among your Friends by setting this to Friends.

Public Post Comments - Or, who can comment on the posts that you’ve shared publicly. It is probably best to keep this restricted to either Friends, or perhaps Friends of Friends.

Public Profile Info - Some facets of your Facebook profile are generally available for anyone to see (like your name and profile picture). Who do you want to be able to comment on your profile picture? Keeping this capability restricted to your Friends or - maybe - Friends of Friends is probably best.

How Much Do You Want Facebook to Know About Where You Are?

Facebook has the capability to track your location history. While this information isn’t shared with your Friends or followers (beyond letting your Friends know that you are nearby), the only real reason we could come up with for Facebook to track this is to be able to target you with ads more effectively. Hopefully, that’s the reason, but even so, it is better to be safe than sorry. After all, Facebook has a history of data security missteps.

Again, starting from the Settings page, click where it says Location on the left-hand side. From there, you can see what Facebook already knows by requesting to View your Location History. However, to disable this, you’ll need to use the mobile application.

Using the Mobile Application to Turn Off Location

From the app, access the 3-bar hamburger icon (found at the top-right), and scroll down until you see Settings & Privacy. From there, you should access Privacy Shortcuts, where you’ll see a new area with various settings and documentation regarding Facebook’s identity controls.

Find Manage your location settings (you shouldn’t have to scroll to find it). Once there, you should:

  • Turn off Location History (found in Location Access)
  • Turn off Use Location (in Location Services)
  • Find and disable Background Location

While you’re at it, you may as well delete your existing Location History.
Again, from within Privacy Shortcuts, select Manage your location settings and then View Your Location History. You will be asked for your password, and then you will see another 3-dot menu in the top-right. From there, you should Delete all location history.

Take note: if you post a photo with your location tagged, or check into some public place, you may be allowing Facebook access to your location data again.

Yes, this is a lot to take in.

Thank you for sticking with us for so long! We hope this helps you to secure your personal privacy on what is known as the social network. To learn more about protecting your privacy and information, geared more toward your business, reach out to Coleman Technologies at (604) 513-9428, and make sure to subscribe to our blog.

0 Comments
Continue reading

Customer Login

News & Updates

When it comes to growth and advancement, small and medium-sized businesses (SMBs) in British Columbia have been effectively leveraging Coleman Technologies’ affordable enterprise-level IT practices and solutions since 1999. The proof: Coleman Technol...

Contact us

Learn more about what Coleman Technologies can do for your business.

Coleman Technologies Inc.
20178 96 Avenue, C400
Langley, British Columbia V1M 0B2

Operations Center
6600 Chase Oaks Blvd, Suite 100 Plano
TX 75023


2 year badge

Copyright Coleman Technologies. All Rights Reserved. Privacy Policy